Heya, I found how you can digitally sign and encrypt emails! (It even gives them a cool icon for others to see!), and I haven’t seen anything about it before so I thought I’d share how I did it!

Do you also want to send encrypted emails and sign them? Just follow these few steps!
But beforehand, let’s define some terms :
-
Signed email : Email with a valid numerical signature. Anyone can read it and know it has not been modified since it was sent.
-
Encrypted email : Email encrypted with the recipient’s public key. They can decrypt it with their private key
-
S/MIME certificate : A
.p12file containing your private key (So keep it for yourself and don’t send it to anyone!!) and your public key.
Okay, now it’s time to…
Start the setup (Obtain an S/MIME certificate)
- You’ll need to ask to an authority for a certificate. Personally I use Actalis because they give free certificates for multiple email addresses, valid for a year (you need to redo the setup every year). If you don’t want to use Actalis, more info is avilable here.
- Don’t forget to put the website in english if you don’t understand italian.
- Go on the page to request an S/MIME certificate, create an account and follow the setup. The verification email can take a little while (~2min)
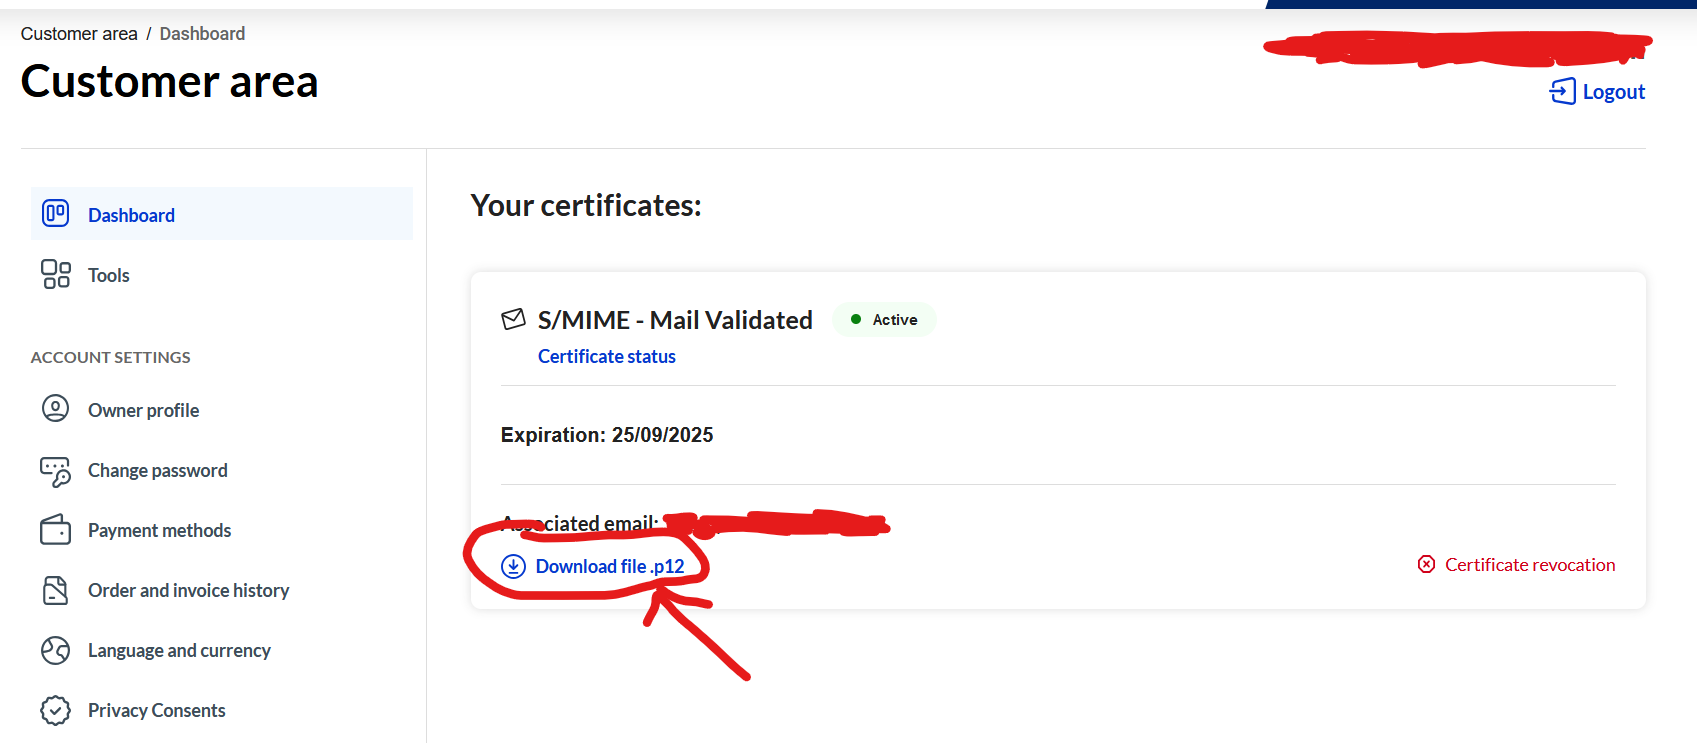
- When the setup ends, you’ll have a valid certificate in your dashboard (It can take a few minutes to appear if you just verified it) that you can download, and a password that Actalis emailed you to enable your certificate.

Install the certificate
- Download the .p12 file, then open it, type your password, and leave the default options to install the certificate on your device (Android or PC, on Android pick “For VPN and apps”). Don’t delete your old one, so you can still decrypt old messages sent on the expired certificate
- Use an S/MIME compatible email client. On PC, there is Thunderbird, on Android, FairEmail.
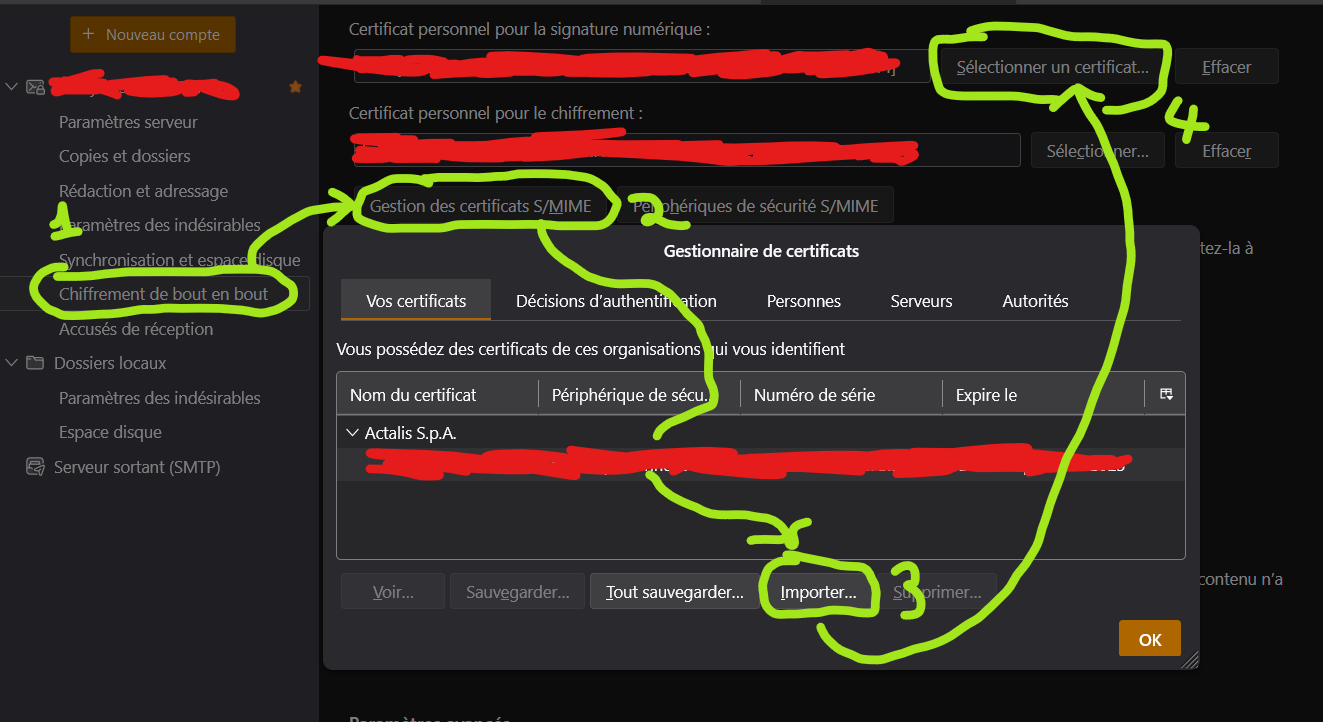
- In your email client settings, importer the S/MIME certificate pofor signing AND encrypting your messages. It changes depending on your client, so here it is for Thunderbird :
- In the top-right menu, go to
Account settings,End-to-end encryption, underS/MIMEclick onManage S/MIME certificates,Importand pick your.p12file. Then, pickSelect a certificate, and pick yours from the tab “Your certificates”.
- In the top-right menu, go to
An image is worth a thousand words (Sorry for the french)

Don’t forget to check the box to sign and/or encrypt every message just below, if you want!
Communicate with someone
Once this is done, here is how you can communicate…
- …While signing your messages :
It’s easy, just click on “Sign” before sending. Usually, email clients show a small medal next to your name to show the email is signed.
- …While encrypting your messages :
For that, you’ll need your recipient’s public key. They needs to send you a signed message (not encrypted, since you don’t have each other’s key at this point) where you can get their public key from their signature, and add it to your email client, which will allow you to encrypt messages you send to them. Then, send them a signed email (you can encrypt it) so they can get your public key and add it to their client, and then you’ll be able to exchange encrypted emails!
I’m not an expert and probably made a few mistakes, if you spot any please tell me in the comments and I’ll try to fix the guide!


Ahh gotcha, that makes sense, so like the difference between a self signed SSL certificate and something like LetsEncrypt.
Re 2: I was thinking in the scenario to allow auto discovery of your certificate, so someone who is emailing you for the first time could look up your public key automatically and use it to encrypt their email.
Also, great writeup and thank you!
I don’t think it’s possible to do that, but I have no experience on this since I don’t use my own email server so I could very well be wrong.